|
Tizen Native API
3.0
|
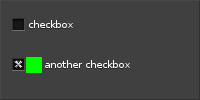
This example will show 2 checkboxes, one with just a label and the second one with both a label and an icon. This example also illustrates how to have the checkbox change the value of a variable and how to react to those changes.
We will start with the usual setup code:
And now we create our first checkbox, set its label, tell it to change the value of value when the checkbox stats is changed and ask to be notified of state changes:
For our second checkbox we are going to set an icon so we need to create and icon:
- Note:
- For simplicity we are using a rectangle as icon, but any evas object can be used.
And for our second checkbox we set the label, icon and state to true:
We now do some more setup:
And finally implement the callback that will be called when the first checkbox's state changes. This callback will use data to print a message:
- Note:
- This work because
dataisvalue(from the main function)andvalueis changed when the checkbox is changed.
Our example will look like this:
